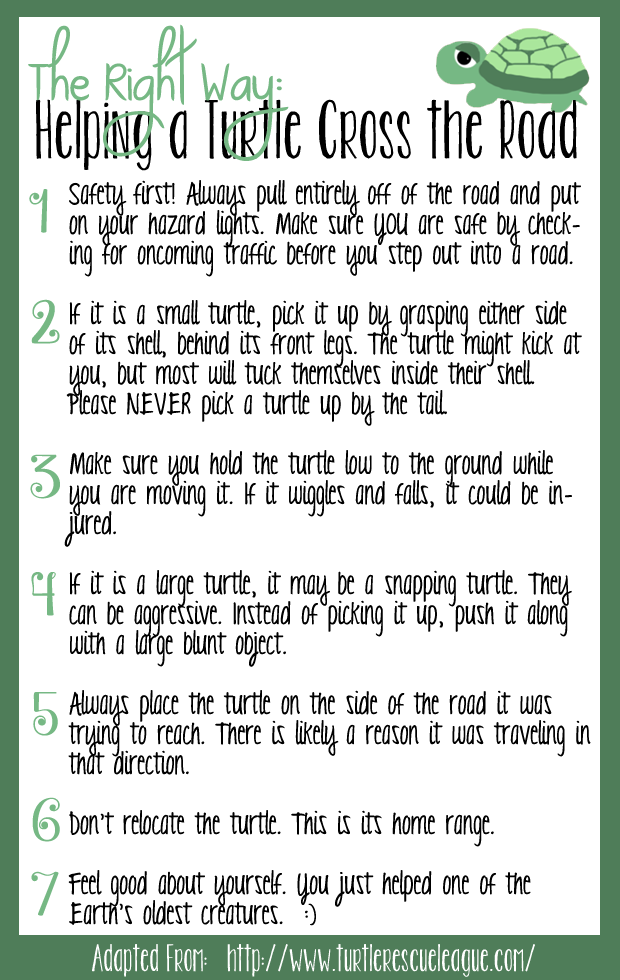
Last week, I was on my way to a hair appointment 30 miles away. While driving down the road, I noticed a little turtle in the middle of the highway. I looked at the time, and I was pushing it, but I decided I must turn around and try to help the little guy (or girl) get across. I remembered someone posting a link on Facebook a while back to tips for helping a turtle cross the road, and I thought, well that was really helpful. Believe it or not, it’s not as simple as picking up Mr. Turtle and setting him on one side of the road… So, I decided to put together a little graphic to share with everyone to teach people the “proper” way to help a turtle cross the road.
Something horrible happened to me today. After ordering the original Urban Decay Naked palette, I waited patiently for it to arrive. Amazon Prime promised me 2 business days and when I got home today, the first thing I did was check for my package. I was so excited, but much to my dismay, I discovered what I received was a FAKE! I am writing this post so this does NOT happen to you.
Let me begin by clarifying… I have bought many things on Amazon. Cameras, lenses, sewing machines, make-up, books, movies, food, clothes… you name it, I buy it. This is the FIRST time I have discovered something was counterfeit. Now, if you are looking for cheap dupes, okay, fine… but this thing is the FULL price, the SAME price as on Sephora. The listing said “BY URBAN DECAY” not “BY FAKE JUNK MAKING GREEDY BUTTHOLES”. I read reviews, and it had mostly 5-star reviews. How did these people not know it was a fake? Well, if you had never used Naked 2, you MAY think the same thing.
Make sure what you are ordering is the REAL DEAL. If you’re not sure when you get it, well… This is how you know…
#1. “This just feels cheap.”
Naked 2 is heavy. It FEELS well-made. The moment I pulled the imposter out, it just felt wrong. Nothing like the Naked 2. I have heard that Naked 2 had made some packaging improvements, so I chalked it up to that. Obviously one is better made than the other, but it LOOKED real?
#2. “Well they sure didn’t do a good job filling these pans.”
… or sticking the pans in, for that matter… You open it. Then you see… something just doesn’t look right. ESPECIALLY if you have used Naked 2. The palette pans aren’t even filled up all the way… they aren’t even glued in straight. The metal is obviously exposed, and bent. I got closer to it to make sure I wasn’t imagining it. Naked 2 looks clean, neat, full. Nothing like this. At this point, I got suspicious.
#3. These colors look funny.
They are close, but they are “off”. The most obvious one I noticed was the Toasted, followed by Gunmetal. There’s something fishy going on here…
#3. “There’s something funny about that logo.”
Urban Decay isn’t a hard logo to imitate. It is a boring serif font of some sort, in all caps. But if you look close enough, usually, the place you will find the evidence to close the counterfeit case is in the logo. Somewhere, something is just slightly off. And I think I found it.
Look very closely, my friends… It’s not in the NAKED. It’s in the Urban Decay. The company logo. Does that R look a little odd?
#4. “It looks a little odd to me… so let me compare.”
Sure enough, something is off. And it’s the R. Someone who doesn’t use fonts or pays attention to design detail may not notice this at all, or even call me crazy. But, despite the size of each logo, it’s the R that stands out. The “tail” of the R is kinda fancy… it swoops down. It is the one thing in the Urban Decay logo that is really different or unique. It’s the signature of the design, so to speak. The end of the R “tail” goes all the way down and aligns with the B. Now, look at our spaced apart fake here…That R’s tail is no where near the bottom of that B. And those letters are spaced apart. There’s one things company’s don’t change, and that is their logo. They won’t use a different font, and they won’t use different letter spacing. I KNEW something was wrong for sure at this point.
#5. “Well, what about the primer that came with it? I guess that’s a knock-off too?!”
If you’ve never used UD Primer Potion (you’re missing out) then you may not know what to expect. I just so happened to have a brand new bottle of it to compare. See for yourself… the logo, the font color, the bottle color… They are close, but they are NOT the same. And the actual products INSIDE the bottles? Oh my, not even close… different brush tip, different consistency, different color.
#6. Well what was the final, gavel-banging, case-is-closed proof that this item is counterfeit?
The inside logo. Once again, if you don’t pay much attention to detail, you might not catch it… but if you look where the mirror cuts off the A and the K and the E… the stock photo of the REAL Naked 1 palette shows something much difference.
LOOK closely at the A. How much of the triangle that makes up the top of the A is shown in the fake (above) vs. how much is shown in the authentic version (below)… The authentic one shows almost 90% of the full triangle top of the A, whereas the fake is roughly 60%. Look closely. You CAN see it. Keep reading over… the K is cut down and so is the E. Look where the FOLD lies… it goes directly through the middle line of the A in the authentic one… it folds way below that line on the fake… Are you ANGRY yet!?
I finally calmed down, after making idle threats to the wall. I am passionate about my makeup. And when I am looking forward to something in the mail, how DARE they ruin my day with fake make-up. When the smoke cleared, I ordered the REAL Naked 1 palette on Sephora.com… for $50. Plus free 3-day shipping. How ’bout that, Amazon?!
So what have we learned?
Now that you know how to spot a Fake Naked 1, shop with care. Amazon disappointed me with this purchase. Lesson learned with make-up. Amazon needs to watch these places that sell through them, and pay very close attention. Sadly, there WERE negative reviews on the site, but they had all been pushed down to the bottom so you only see the great, shining reviews first. Just look. Only order if it is Urban Decay from a reputable cosmetics distributer.
I hope you don’t get a fake… but if you do… you now know how to spot one.
One of my patients brought me a ziplock bag packed full of freshly picked blackberries this week. The fact the berries arrived to me in an insulin cooler is ironic knowing what I did with them… I made a cobbler.
Today, I had something happen that I’ve never experienced before. My pictures disappeared off of my memory card. It was like they never existed! Even the pictures I took most recently with the dogs are gone. All the rest of the pictures on the card are in-tact, but the most recent ones are not there. *Sad*
Luckily, I took one picture with my iPhone just to upload on Facebook as my way of saying “Nana nana boo boo!”
I can definitely vouch that it was delicious and you should try this recipe! Even Ryan, who had never before had blackberry cobbler, said it was “delicious!”
It took about 10 minutes to mix up and 50 minutes to bake. So simple. Even the kids can help you make this one.
1 cup sugar & 1/4 cup sugar & 1 Tbsp sugar
1 cup self-rising flour
1 cup milk
1/2 stick butter
1 1/2 to 2 cups blackberries (fresh or frozen)
Preheat oven to 350 degrees F. Grease a 2-3 quart baking dish with the butter. Whisk sugar and flour together. Add the milk and whisk until smooth. Melt the stick of butter in the microwave and then add this to mixture. Whisk. Pour into greased baking dish. Sprinkle the blackberries on top of mixture (some will sink down which is fine.) Sprinkle about 1/4 cup of sugar on top. Put in the oven and bake for 40 minutes, take out and sprinkle remaining sugar on top. Put back in the oven for about 10 more minutes. (You may want to watch it, just bake until it is golden.) Remove from oven. Cool for about 30 minutes and then serve with vanilla ice cream! Enjoy!
A couple came in together, both of them only a few months away from turning 80. My patient was accompanied by his wife and caregiver who displayed her devotion by holding his hand in hers throughout the entire visit. She was telling me how she had starting jogging when she was 74-years-old and now jogs 3 miles every morning, which has resulted in over 100 pounds of weight loss. She explained, “I just finally decided to do something about my OWN health.” With a sweet smile, she patted their clasped hands with her other and continued, “I just have to make sure I live ONE DAY longer than THIS butthole!” Now if that ain’t true love, I don’t know what is!
UPDATE 2014: I stopped using the MAC Pro Palette and went back to the old one. The shadows stay in place and it fits in my bag better. I accidentally dropped the Pro Palette (on the counter during use, only about 1 foot) and it busted up 2 of my shadows. For such a short drop, it shouldn’t have destroyed them. *throws up hands* I’m done!
Let me start by saying that when I first started wearing MAC makeup, I bought eyeshadows in the little individual pots. After I got a real job, I could afford more than two of those, and I soon discovered that the most cost effective (and least cluttering method) was to buy the pan refills and get a palette. I’ve had it for about a year now. (PS. It’s easy to get the pans out of the little individual pots too, just in case you were like me and had a few already –just set them on top of a flat iron to heat the glue holding it in and then use a pin to pop it out of the pot. The glue will still be sticky on it, so slap a magnet on the back and Vuala!)
Sadly I am just now discovering that the old MAC pro palette got discontinued. You have no idea how this upset me. I finally collected enough shadows to fit into two 15x palettes and they go off and stop making the old ones. It would turn my mild OCD into a major problem if I had two different palettes so I scoured eBay in search of some old ones. The “new” ones have been out since 2012, but I knew that there would be some old ones still floating around. Let me just tell you, folks are proud of their old used palettes. Bidding was up to $60 and $70 on sets of only 2 palettes. People, please!
Since buying more old palettes was obviously a pain in the butt (and expensive) I decided to bite the bullet and buy the new ones. I should have protested, but I am a sucker. I figured I’d go ahead and get the Large/DUO version where you can fit two little pan holders in at once.
HOW ABOUT THE SIZE/WEIGHT?
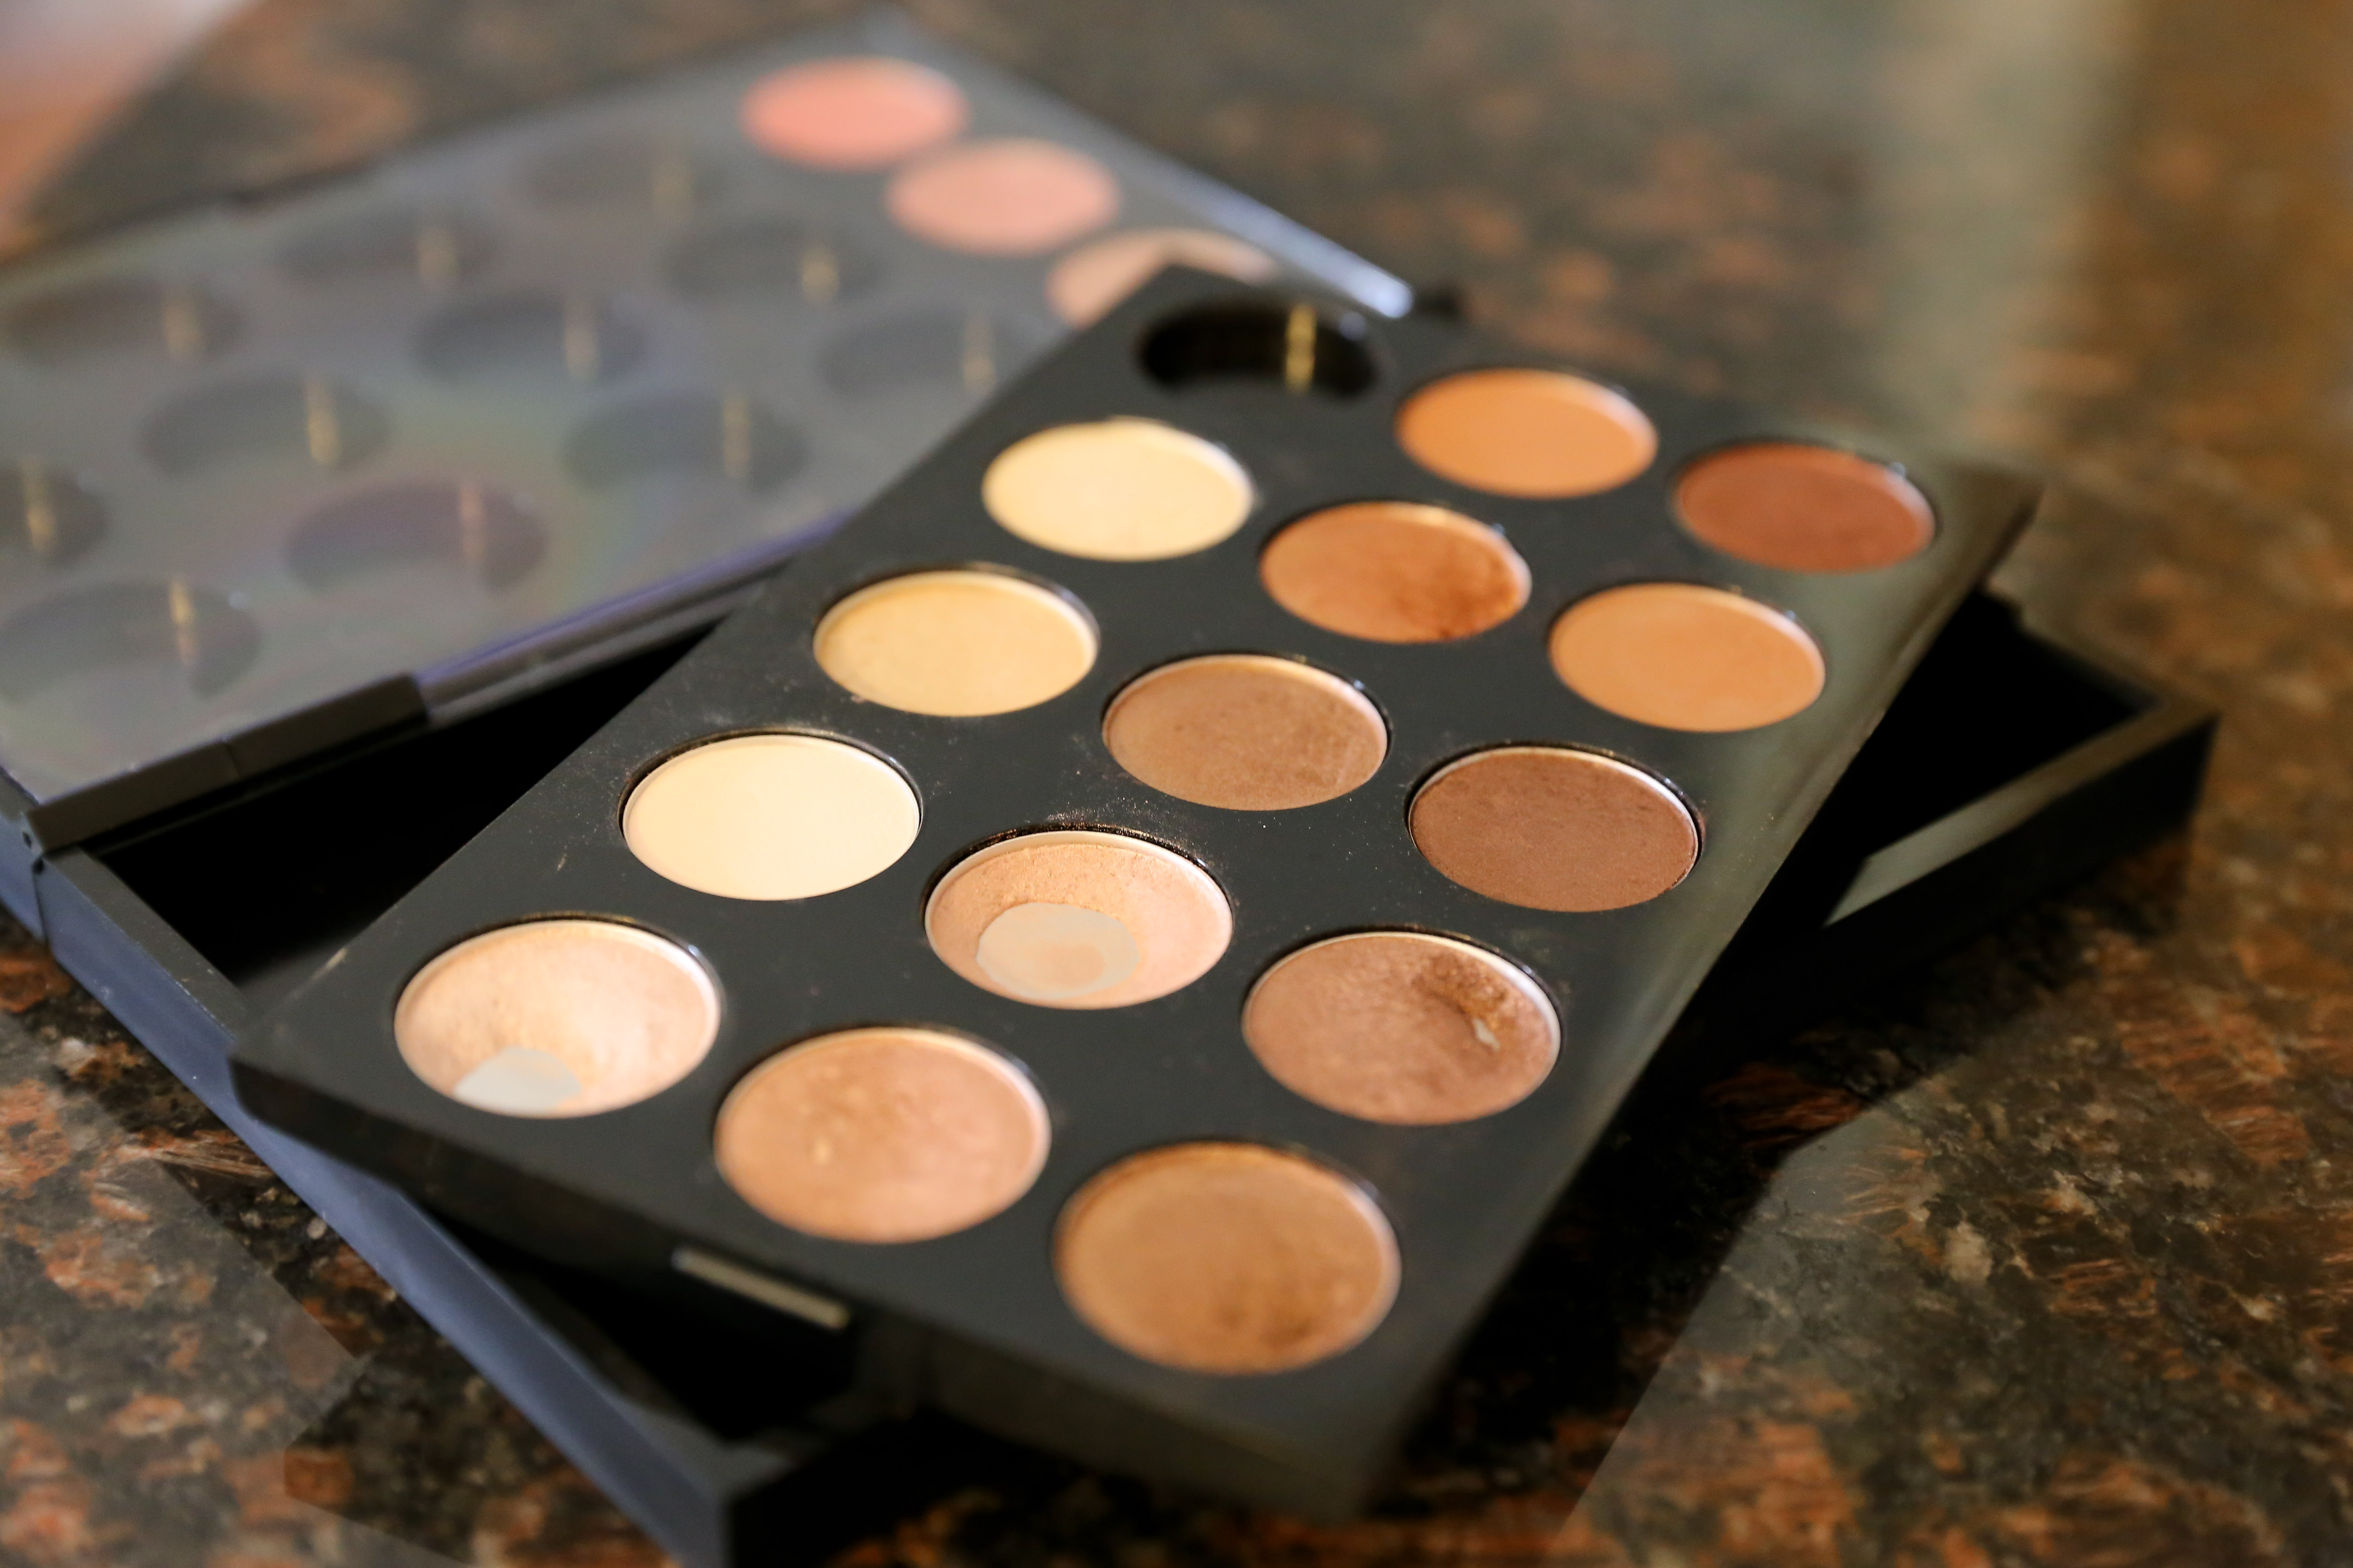
Here’s what it looks like when you take it out of the box:
This is NOT small. It is much thicker than two of the old palettes stacked and a good bit heavier. (Probably 3-4x thicker than the old palette.) It feels sturdier in hand though, so it’s probably less likely to crack or bust. But it’s going to weigh down your makeup bag a good bit more, and take up valuable space… so if you’re like me and you tote it with you everywhere, you might not love that aspect.
DOES IT LOOK NICE?
Definitely, I like the way it looks. If it is clean. The only downside of the design is the inserts are made of shiny black plastic. It will show every speck of powder that lands around the pans… and it is impossible to keep it 100% clean. For some people, this may not be an issue, but for me, it makes my OCD act up a little and I find myself trying to wipe around them. On the old container the flyaway didn’t bother me as much, just because it less obvious on a matte surface.
WHAT ABOUT FUNCTIONALITY?
It serves its main purpose. It holds eyeshadow securely… With that being said, however, it really is a pain in the butt to pop out the insert holder once you get it in. And when I opened it the first time, I pinched my fingers on the middle back because it opens just like a book. So beware if you get in a hurry. The upside is the pans sit in secure enough to stay in place, but loose enough to pull out with one fingernail around the edge. If the insert is out, they are super easy to remove because the insert has holes in the back you can just push through. The clear plastic separater in-between the two halves has a functional purpose, and it is 100% necessary. It looks nice too, clean and sharp, but it’s not really easy to grip to open and close either. It takes a little practice.
IS IT COST EFFICIENT?
The case is $25. Just for the stupid case! Then, the inserts are $9. What a ripoff! So, if you buy 1 duo case($25) + 2 inserts($9) = $43 (and don’t forget Uncle Sam’s part!) If you fill the case with all eyeshadows in the 2 inserts, you are looking at $1.43 per shadow space. The old palettes were only $16 but held half the pans, so it is roughly $1.06 per shadow space. If you don’t use the inserts at all and decide to put 24 shadows into the pan on each side, you’re looking at only $0.52 per shadow space.
Personally I like the way it looks with inserts, but if I had more shadows, I could see where not using them would be beneficial and MUCH more cost-efficient. Another advantage would be that you can buy inserts for blush and other MAC cosmetic pans as well, so if I needed to carry a lot of powder or blush as well I would probably really appreciate that feature.
IN SUMMARY:
I like the way it looks.
I like how sturdy it feels.
I hate how heavy it is compared to the others.
I think it’s less easy to get open and access.
I hate how expensive it is with the inserts. Those greedy buttholes.
Since the weather has been unpleasant (i.e. Tropical Storm Andrea, now 95 degrees) I haven’t gotten to play much with my fancy new 24-70 outside. It is literally like a sauna out there. I took these pictures around 7:00-8:00PM this evening and the moment I walked outside my lens fogged up. *Grrr*
In between lens wipes and swatting away the billions of germ carrying gnats, I was able to catch a few shots of the boys. Did I mention I loved this lens? It is ridiculously sharp for a zoom lens and the colors are fantastic. Even with the dark rapidly approaching, this lens delivered images more beautiful than any of my previous lenses. And on the light hungry 6D? *Swoon*
One of the main questions I kept coming across in reviews of this lens: “Is it worth it?” I won’t lie, it really hurt my feelings to buy a lens this pricey, but I am starting to see that it is, in fact, worth it. For months I have longingly been staring at this lens on Amazon, waiting patiently for the price to drop. It hasn’t, I became impatient, and I finally made the decision to just jump right in after my 60D kit sold. They have a 30 day return policy, right?
The day it arrived the weather was total crap and I was having serious buyers remorse. Now, however, I’ve decided I am ditching my other zoom and adding it to my bag permanently. The build quality of this lens is absolutely amazing — if someone ever attempted to steal it, you could just whack them upside the head with it and next thing they know they’ll be sitting in front of Saint Peter (or Elvis) having to explain what they’d just done. It is fast, sharp, intuitive, quiet. I like the extra full stop with the f/2.8, which is where the 24-105mm f/4L IS falls short for me. I’m happy to give up the 70-105 zoom range for the full stop of f/2.8. It’d only be perfect if it had IS. With that being said, we all know there’s no such thing as perfect… but this is close.
I love this picture. It was just how I saw it… except BETTER because there is no drool in my lap! Thor says “PLEASE! Throw the ball. Throw the ball. Throw the ball.”
Dirty slobbery Thor at dusk even looks beautiful through this eye
Trying out the zoom on Duncan since he won’t come near my camera. He’s so lovely. And I can practically SMELL the grass in this picture it is so crisp and sharp! *Sigh*
This was right after he pooped in the yard and ran through it. And also right after he got thrown in the sink and covered in dish detergent because the dog shampoo was two rooms away. It was either dish detergent or poopy feet all over my tile floor. #JoysOfDogOwnership
I was on blogger for years, but it was a love-hate relationship. It seems like most of the serious bloggers I know have WordPress blogs, and I have noticed their blogs look beautiful. Not that I have anything interesting to talk about, but I have found myself here, among the best. If you want to follow, by all means. Welcome.
My life revolves around my work and a series of hobbies. I love taking photos and consider myself a semi-pro photographer (defined= I’ve been paid for my work, but now I choose to work for fun.) I’m a Southern girl. Unfortunately, you will not be able to appreciate my glorious accent on this blog, but I consider it a gift. No truer words have been spoken than “American by birth, Southern by the Grace of God.”
My greatest accomplishment in life has been the start of my career. I graduated pharmacy school in 2011, finished a PGY-1 residency in 2012, and I am currently in clinical practice as an ambulatory care clinical pharmacy specialist at a VA hospital. I love my job and I love my Veteran patients. For the first time in my life, I am happy to go to work every day. Well, after about 1 hour and my morning coffee.
Other than photography and shilling out drugs, I like baking (and eating) cookies, sewing, scrapbooking, drawing, painting, and an array of craft projects. Like any true Southern Woman, I love pocketbooks, perfume and makeup. However, my true passion is animals and I have 4 rescued pets; 3 Australian Shepherds and 1 Feline.
I also have a boyfriend named Ryan. He is pretty swell, I think.